Clarity, focus, and direction! That's what most businesses need today. Why? Because even the best ideas can get stuck in delays, confusion, or missed deadlines. That's where Project Timeline shows its magic! It brings all three together in one place.
Whether you're running a small task or a complex project, a timeline keeps your team aligned, your work organized, and your goals within reach. In this blog, we will break down what exactly a Project Timeline is, how to build one, the different types, and how it can transform your project outcomes. Let’s get started!
Table of Contents
1) What is a Project Timeline?
2) Why are Project Timelines Important?
3) How to Create a Project Timeline?
4) Different Types of Project Timelines
5) Benefits of a Project Timeline
6) Best Practices for Project Timeline
7) Conclusion
What is a Project Timeline?
A Project Timeline is a visual plan that shows all the tasks in a project, who is responsible for each one, and when they need to be completed. It provides the project’s schedule in a clear, step-by-step, chronological order from start to finish.
This timeline can look like a chart, a graph, a list, or a set of boxes and arrows. It is like a roadmap for your team. It helps you and the team see the bigger picture and stay on track. For example, for a website launch project, the timeline might include tasks like “Design Homepage” (Week 1), “Develop Backend” (Weeks 2–4), “Testing” (Week 5), and “Launch” (Week 6), showing who is responsible for each step.

Why are Project Timelines Important?
Project Timelines provide a clear plan, improve teamwork, and help avoid delays. Here is why they are important:
1) Clear Project Overview: It gives a big-picture view so that teams can see how the tasks fit into the full plan. It also helps spot problems early.
2) Better Resource Management: It helps plan people, tools, and budgets in the early stages of a project, which avoids last-minute issues.
3) Easier to Manage Large Projects: Breaking work into smaller steps makes projects less stressful and more organized.
4) Stay on Track: Timelines show deadlines and progress. If a task gets off track, you can fix it early. This keeps the team motivated and reduces the risk of delay.
5) Improved Communication: With a shared plan, teams and stakeholders will communicate better and stay aligned.
How to Create a Project Timeline?
A good Project Timeline helps your team stay organized, manage time better, and finish tasks on schedule. Here are the seven steps involved in creating it:
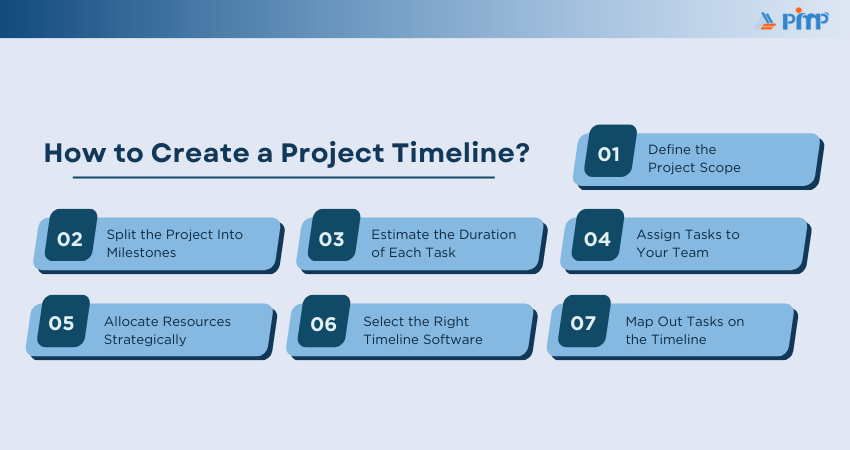
Step 1: Define the Project Scope
Before creating a timeline, you need to understand what your project is about. For that, you can define the main goal, key deliverables, expected results, deadline, and budget limits. Knowing your project’s size and goal helps you plan each task properly.
Example: We will deliver a working model of the mobile app with login, profile, and dashboard features by November 30.
This sets clear goals and helps estimate time, team effort, and tools needed.
Step 2: Split the Project Into Milestones
Next, create a Work Breakdown Structure (WBS), which lists everything involved in a project. Convert related tasks into milestones and big checkpoints that show progress.
Example: Plan your milestones like completing the login system for the app, finishing profile creation steps, or building the dashboard.
Each milestone will include multiple smaller tasks that count towards the final delivery.
Step 3: Estimate the Duration of Each Task
Now, you need to figure out how long each task will take. When you break the task into small parts, you can easily find it. This helps you avoid underestimating time and gives a more accurate plan. Tools with built-in time tracking can make this step even easier.
Example: You can plan one day for login design, three days for backend work, and two days for testing and finalizing the app.
By estimating each small task, you can manage your project deadlines effectively.
Step 4: Assign Tasks to Your Team
Now it’s time to decide who will do what tasks. So, assigning the right people to the right tasks is key. The factors to consider include skills, workload, and availability. Make sure each team member knows their responsibilities and deadlines.
Example: If your Backend Developer is stronger with logic than design, let them build the login system, while your Frontend Expert handles the dashboard layout and user experience.
This way, each person works on tasks they’re confident in, which saves time and improves results.
Step 5: Allocate Resources Strategically
Resources include people, tools, money, and materials. Managing resources is as important as managing tasks. Make sure each task has what it needs to be completed on time. For that, you can check for bottlenecks or overloaded team members.
Example: The dashboard needs 30 hours, but your Frontend Developer is available for 20 hours only. You can split tasks across two team members and add a 10% buffer for testing the bugs.
This keeps the schedule realistic timeframes that are flexible for every team member.
Step 6: Select the Right Timeline Software
You can use a spreadsheet for creating a Project Timeline, but a Project Timeline software will be much more efficient. It updates tasks, tracks progress, and shows dependencies. There are many tools available, like Microsoft Project, Trello, Monday.com, and GanttPRO, that can help build and manage timelines.
Example: You can consider using GanttPRO to visualize the project stages like features, dependencies, and checkpoints.
A tool helps keep everything updated and visible to the team.
Master Trello today - Organize tasks effortlessly and boost productivity with our Trello Training now!
Step 7: Map Out Tasks on the Timeline
Now, you can place all the tasks on your timeline, in the right order. Add start and end dates, dependencies, and team responsibilities. You can also review everything you have planned with your team.
Example: The login screen will be designed on September 25–26, the backend will be built on Sept 27–29, the UI will be connected on Sept 30, and the application will be tested on Oct 1.
Do the same for each task. Add deadlines, dependencies, and team names so everyone knows what’s next.
Different Types of Project Timelines
Let's check some of the Project Timeline types so that you can check which type suits which projects:
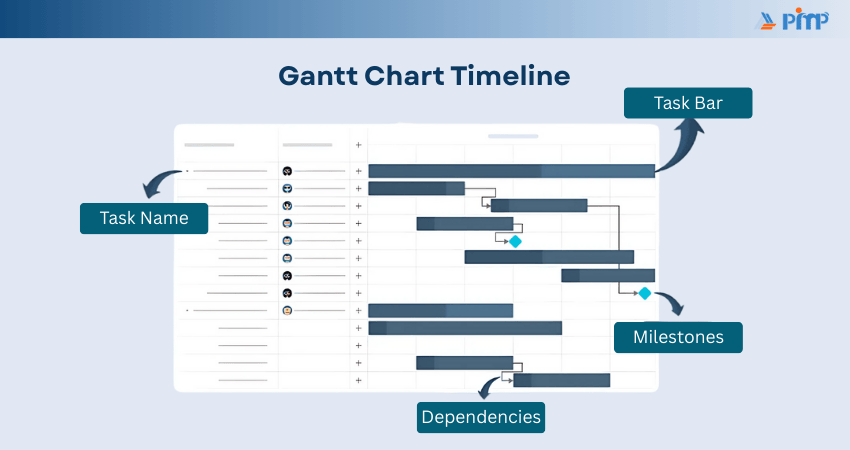
1) Gantt Chart Timeline
A Gantt chart is one of the most popular Project Timelines. It shows tasks as horizontal bars across a timeline. In that, you can see task duration, start and end dates, and overlapping tasks. It’s great for tracking long or complex projects.
2) Historical Timeline
The historical timeline shows key events or tasks in a straight line based on dates. It is often used to show past progress or project history, useful in presentations or reports. This type is especially used in educational or retrospective projects.
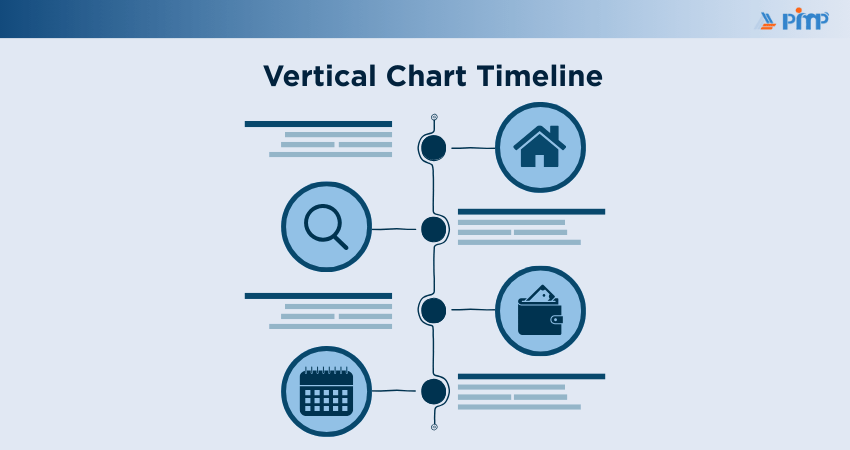
3) Vertical Chart Timeline
This timeline shows key events or tasks in a vertical, straight line based on dates. It is generally used to display past progress or project history, useful in presentations or reports. It’s easy to read and works well for short projects.
4) Kanban Timeline
It is inspired by Kanban Boards. Used in tools like Trello or Jira, a Kanban timeline shows tasks as cards moving through columns such as “To Do,” “In Progress,” and “Done.” It is flexible and suitable for teams that follow Agile or Lean methods.
5) Critical Path Method (CPM)
The Critical Path Method (CPM) method shows the independent tasks that might affect the Project Timeline. It helps you see which tasks cannot be delayed, or the whole project will be late. Overall, you can use this to avoid delays in your project.
6) Program Evaluation and Review Technique (PERT)
PERT is a timeline used for big or complex projects to estimate the time required for each stage in a project. It looks like a flowchart, and it is useful when there is a lot of uncertainty in a project plan.
Integrate projects effectively and manage interdependencies with our Program Management Professional (PgMP)® Certification – Register now!
Benefits of a Project Timeline
It is time for you to check how timelines make your project better. So, here are its benefits:
1) Better Planning and Structure
1) Provides a clear timeline from start to end
2) Helps effectively schedule tasks
3) Makes resource planning and tracking easier
2) Clearer Communication and Team Coordination
1) Keeps everyone align with the one goal
2) Reduces confusion and miscommunication among the teams
3) Improves teamwork with shared deadlines and goals
3) Optimized Resource Usage
1) Helps allocate tools, people, and budgets
2) Avoids overbooking and bottlenecks
3) Supports smooth task handling between teams
4) Improved Team Accountability
1) Assigns clear responsibilities to team members
2) Encourages ownership of tasks and deadlines
3) Boosts team motivation and productivity
5) Risk Mitigation
1) Identifies task dependencies and possible delays
2) Helps manage critical paths and weak spots
3) Allows proactive issue resolution before escalation
6) Client Satisfaction
1) Gives visibility into project progress for the clients
2) Builds trust through transparency and regular updates
3) Makes it easier to manage expectations and changes
7) Informed Decision-making
1) Offers real-time data on project status
2) Supports quick, informed choices under pressure
3) Helps keep the project within time and budget
Discover the skills to manage portfolios effectively with our Portfolio Management Professional (PfMP)® Certification – Sign up soon!
Best Practices for Project Timeline
Creating a timeline is the initial step. To keep your project running smoothly, here are the best practices that you should never miss throughout the project:
1) Estimate Duration of Tasks
Try not to rush through time estimates. Take enough time to break down each task into smaller steps and ask your team for input. Those who work on such tasks often know better how long things really take. It will also be effective if you add a bit of buffer time, just in case something runs late. That little extra time can save you a lot of stress down the line.
2) Determine Necessary Resources
Before starting your work, make sure you know what each task needs. That includes time, people, tools, and budget. Planning this early helps avoid last-minute shortages, missed steps, or overloaded team members. It’s much easier to shift things now than to fix a mess later.
3) Revise Your Project Timeline Regularly
A Project Timeline needs to be a dynamic tool, not a one-time setup. As the project progresses, tasks may shift, priorities can change, or new requirements may emerge. Regularly reviewing and updating the timeline ensures it stays accurate and relevant, helping the team remain aligned and focused on the most critical objectives.
4) Communicate with Your Team and Stakeholders
Share the timeline with your team and the stakeholders from the beginning. Keep them informed as things change. This is because when everyone understands the plan and timeline, collaboration improves, decisions are faster, and trust grows. Good communication is key to staying on track.
Conclusion
A Project Timeline is not just a chart or list. It is the foundation of a successful project. It helps you stay on track, organize your team, and finish on time. Whether your project is big or small, it keeps everything running smoothly. By choosing the right timeline type and following the right steps, you can plan better, avoid problems, and make your team more successful.
Upgrade your effective project execution with our Certified Associate in Project Management (CAPM) ® Training – Join today!

 Back
Back
 Topics
 Courses


 04 Jul 2026

 David Walter